Setup of a company:
INTRODUCTION
INTRODUCTION
To setup a new company
in peach tree open the software. Following screen will appear

From this screen you
can do following things:
1st: You can
maintain the records of an existing company.
2nd: You can
setup a new company.
3rd: You can
learn about peach tree accounting through an online tutorial.
4th: you can
explore a sample company.
5th: Can
convert the data from “Quick book” or “One-write plus company”.
6th: You can
close the window
Now if you want to
setup a new company, from the above mentioned window screen click on “setup a
new company”.

A wizard will start
from this introductory window:

INFORMATION OF COMPANY
This window tells us
that what things you are going to be asked. From the above window then click
the button “Next” a new following window will open in which the information of
the company will be required:

Fill the information
which is required by the above window.

CHART OF ACCOUNTS 1
After filling all the requirements click the
button “Next” the following window will appear:

From this window you
will select the chart of accounts for your company. There are 5 options for
selection of chart of accounts. Whether you want to pick chart of accounts from
the sample company the software has for an example. Or you can build your own
chart of accounts. You can also pick the chart from software and can convert
that in the peach tree. Another option is that you can select the accounts
which are present in the software for different types of company. If we select
the 1st option then click the button “next” the following window
will appear.
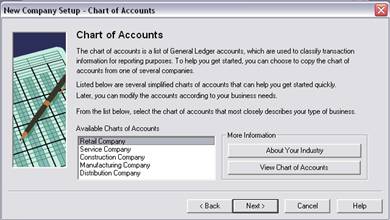
This window shows the
available chart of accounts within the software for different companies such as
Retail Company, Service Company and Manufacturing Company etc. select your
company type from this window. In this window you can also view the chart of
accounts the company you have selected. Just click on the button “View chart of
accounts” a window will open containing the chart of accounts. Just as the
option Retail Company is selected then clicks the button “next” the following
window will open:

See the chart of
accounts shown in the window. If they suits your company select them and click
the button “next” for further proceedings.
CHART OF ACCOUNTS 2
Now I am going back to select the 2nd
option by clicking the “back” the same window will open. 
The 2nd
option is about the extensive charts of accounts. Select the option and then
click “next”. The following window will open:

The window shows the
names of the companies related to the services companies. Now again you can
view the chart of accounts by clicking on the button “view chart of accounts”
CHART OF ACCOUNTS 3
Then again I am
clicking back to view rest of the options. The 3rd option is copy
settings from an existing peach tree accounting company.
From this you can copy
all the accounts and settings of the existing company. Click the button “next”
the following window will open:

Here are three existing
companies. In front of the companies there is a blank box. When you click on
the view chart of accounts the chart of accounts of the selected company will
appear in the blank box. Such as:

Select the desired
company for your accounts and click the button “next” for further procedure.
I am clicking back to
view the other options. The rest of the options are “convert the company from
another accounting program or build your own company. The 2nd last
option means that you are having another accounting program instead of peach
tree and you want to convert that in peach tree then you will select that
option. If no chart of accounts are suitable for your company you can make them
on your own. I am selecting the 1st option first. By clicking on
next button I will select my desired company such as the service company:

ACCOUNTING METHOD
Then click the button
“next” the following window will open:
This window will ask
you that what type of accounting method you want. There are two types of
accounting methods as we know one is Accrual and the second is cash basis
accounting system. Select your accounting method and click next. Do remember
that once you have chosen your accounting method it can not be changed.
POSTING METHOD
The
next window will be:
The window is about the
posting method. There are two methods peach tree accounting can use to process
transactions, Real-time and Batch. In real-time transactions are posted in the
general ledger as they are entered and saved. Most companies use this method.
In batch method transactions are saved by the program and then posted in a
group. This method allows you to print register and analyze the saved
transactions before posting them in journal. Select the method you want and
click next. I am selecting real time method.
ACCOUNTING PERIOD
The next window will be:
This window asks you
about the accounting periods. Accounting periods are units of time that divide
your fiscal year for reporting process. In peach tree accounting, you can
divide the fiscal year into as many as 13 periods. Most companies use monthly
periods (where the units match the 12 calendar months). Select your accounting
period and click “next”. If you have selected the 12 month accounting period then
the following window will appear:

As you have chosen the
12 month accounting period the peach tree will automatically set up your first
two fiscal years based on the information which you will provide to the
software which is asked in the current window. When do you want your fiscal
year to start? Select the month and date from which you want fiscal year to
start. Then there is an option that “what is the first month you will be
entering data? Select that month also and click “next”. The following screen
will open:

This screen shows you
the some defaults that have been set up by the peach tree software. You can
change the settings, shown in the respective screen, at any time by selecting
“Default Information” from peach tree Accounting’s maintain menu.
COMPLETE
Click the
button “Next” to complete your set up. By clicking next the following screen
will open:
Now you have completed
the required information for setting up a Peach Tree Accounting company. You
can change the default options at any time in peach tree accounting. For
example you may want to change a default setting to match your specific
business needs. Now click the button “finish” so that the set up of your
company can save. Without pressing finish button your company will not be
saved.

This small window will
appear after clicking the finish button. It means your settings are saving.
After the completion of this process a new window will open that is:

Now you can maintain
your accounting records on peach tree.
CHART OF ACCOUNTS 3
Now if we have selected
the 3rd option from the following window:
On clicking on the
button “next” you will see the window in which the already existing companies
will be given. By clicking on the “view chart of accounts” button you can see
the chart of accounts of the selected company. Then you can copy the whole
settings of that company to your own.

Now click the “next”
button for further proceedings.

The above shown screen
is telling you about the information that you are going to copy from the
selected company. You can select the information you want to copy. Then by
clicking the next you can complete the rest of the process. All the other process
is same as discussed earlier.
No comments:
Post a Comment